Showing posts with label Crafty Stuff. Show all posts

Wednesday, December 17, 2014

Snowman Candy Bars

The kids made their teacher gifts yesterday.  If it's possible and doesn't make me too crazy, I try to have the kids give something that they have some sort of investment in.  This year, we opted for snowman wrapped candy bars.  Easy peasy.  The big kids did almost all of it themselves.  Zeke cut all of the noses for his, glued that hat together, added the buttons, drew his faces, and wrote his name. He may or may not have made one that has a mustache.  However, his smile is a bit squiggly so I'm not sure the recipient will know that's what it is.
Looking serious

Finished products.  I should have added a bit of blush to the cheeks for added cuteness but I forgot.

Thursday, October 30, 2014

Muddy Pudding Potion


Want to try some Muddy Pudding Potion?
Conleigh is bringing treats to her class Halloween party tomorrow so that's what she is bringing.
She's excited to tell her friends that she brought worms and dirt.
She really wanted doughnuts (surprise, surprise) but Papa told her doughnuts weren't a Halloween treat.
I was game for creating something Halloween related with doughnuts and did find some really cute spiders but then saw pudding dirt cups in an ad and thought they looked less time consuming.
Each kiddo will get a pudding cup and a bag of supplies to make their own potion.
Best part?  Conleigh basically assembled them all by herself!

Monday, October 13, 2014

Shutter Shelf

It seems like I am forever rearranging things around this joint.  I organize something and then decide that however I had it positioned is not functional.  So I reorganize and then reorganize again.  Case in point:  the boys' dresser.  They've had this dresser in their room forever.  I originally had a few items on the top:  the Haitian wood boat, some Walmart canisters that hold army men and army planes and tanks, and a panting Kenson made.  But the boys kept piling stuff on top of the dresser and everything would get knocked off and it just looked like a mess.  The other issue was that the boys had books in their room on a bookshelf but Grabby McGrabberson aka Kai was creating a disaster with the books.  So plan a was to organize the books and plan b was to organize the treasures that my kids had that we wanted to dispaly.  The books are now in the boxes on top of the dresser.  The army toys are still in their home beside the boxes.  (Seriously one of the best and easiest storage tricks ever.  It's just a Walmart canister that had a white lid.  But I spray painted the lids brown and they just look so much nicer.)  I knew I wanted a shelf of some type to hold the items for display since a shelf would keep the objects out of little hands and free from the danger of being knocked around.  And guess what I found in my garage?  An old shutter and 2 wrought iron fence brackets.  So I made a shelf for zero dollars, which makes my heart happy.  Now the shelf has the Haitian boat, Kenson's painting, two magnet boards for photos of the boys' foster/birth families, the alarm clock (which was forever getting messed with), Zeke's trophy for being an honorary coach at the Shrine game this summer,  and a fish Zeke painted during his hospital stay at Mayo.  I guess I'm now content.  Until I decide to rearrange again.


Friday, July 25, 2014

Summer DIY Fun-Builder Mirror to Distressed Pieced Wood Frame


Wish our bathroom was a tad wider so I could get a straight on picture but this will have to do.  Using a bunch of old trim and Command adhesive strips, we framed out the builder grade mirrors.  I did all sorts of different distressing tricks including some distressed paper on wood, distressing with wax, and distressing with stain.    The vertical sections are almost all corner pieces.  Some of them were actually pretty nicely distressed the way they were so I left those ones alone.  I think total cost would be $30 since it cost me $25 for the whole box of corner pieces.


Tuesday, June 10, 2014

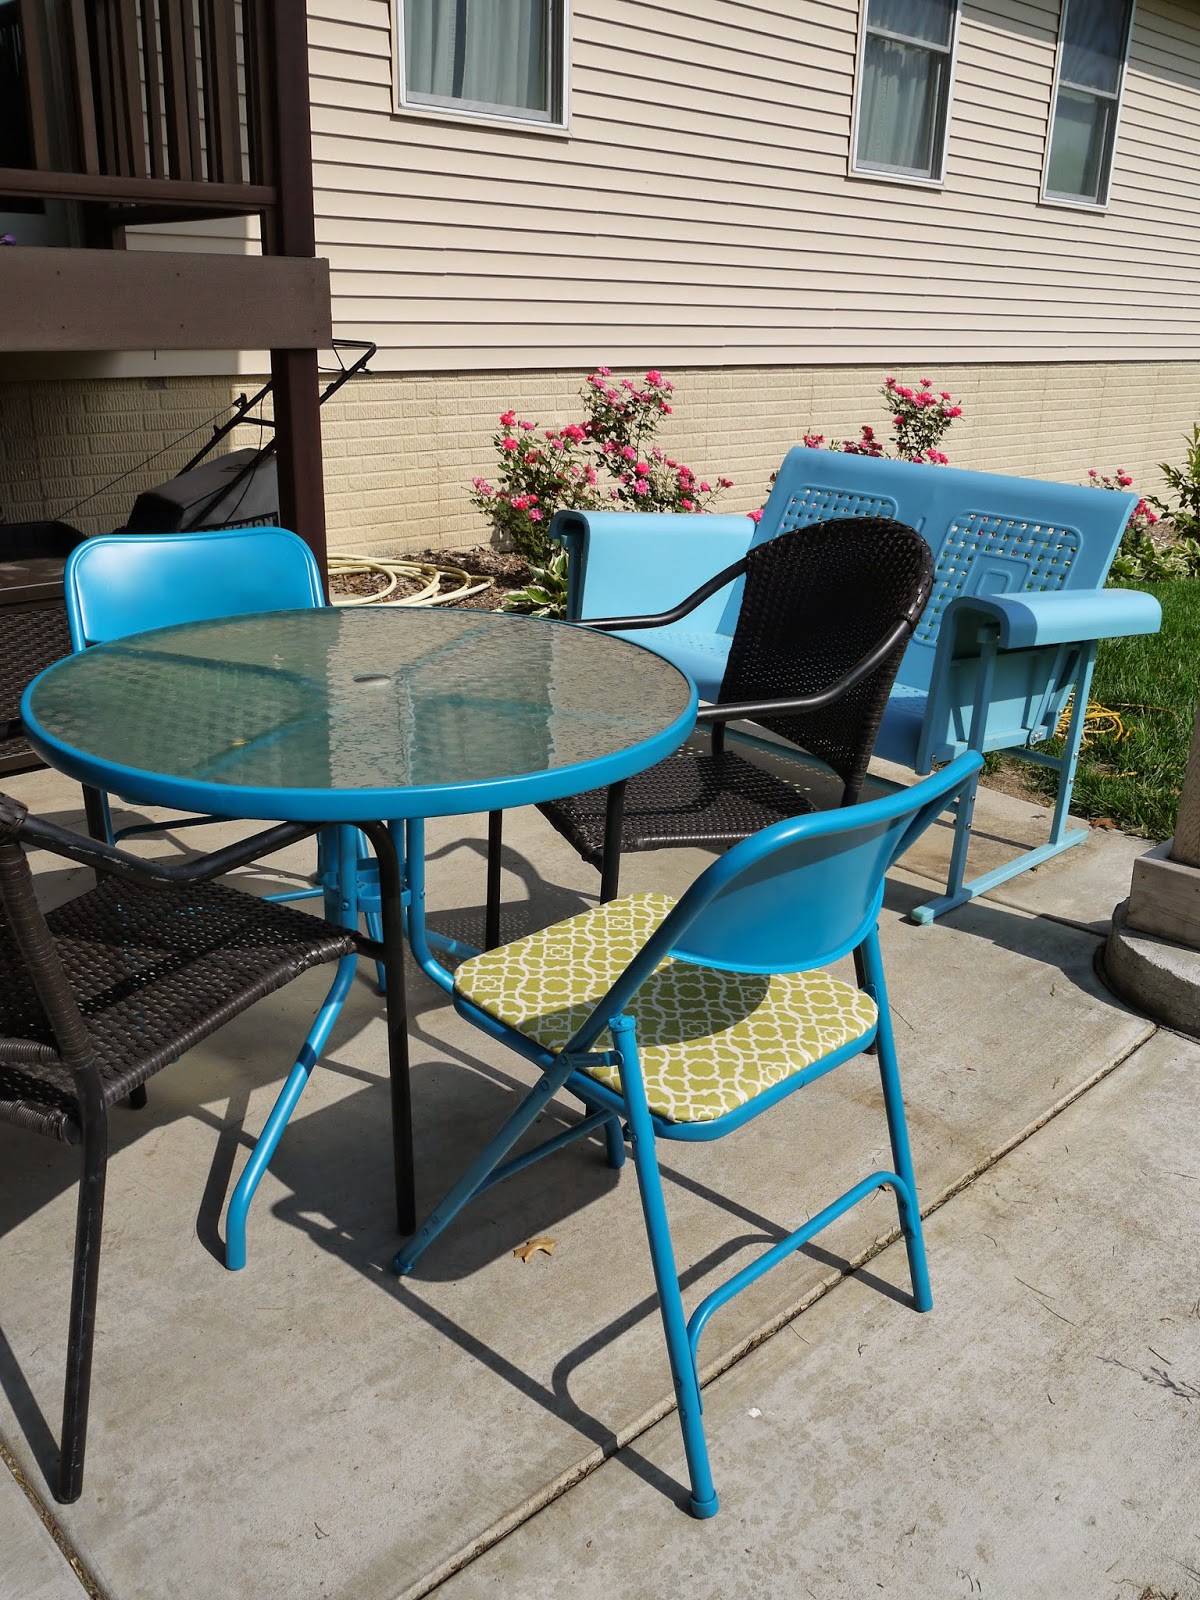
Patio Redo

With D done with school, I can actually get a bit more accomplished, including this redo of our patio.  The short version is 1.  I straightened things up a bit. and 2. I gave some old patio furniture new life.

The low down on the straightening-our patio was a mess.  We have a ton of stuff that needs to go in a shed but having limited time to do yardwork and outdoor projects on a new construction, we had to prioritize and a shed did not make the top of the list.  So a lot of our outdoor stuff is shoved under the patio steps.  Hoses, flower pots, outdoor toys-it's kind of a big mess.  We had just been using an extra large Rubbermaid tote for the kids' toys but it looked super sloppy.  So this spring, I ordered two storage benches with lift up seats.  Not only do they look better than the large blue Rubbermaid box but they also will give us some extra seating.

The low down on the patio furniture-Many years ago we purchased a cheapy patio set with a glass top table, umbrella, and fabric folding chairs.  The chairs and umbrella are long gone but the table was still hanging around.  It was the traditional hunter green.  Last summer we bought some wicker like stacking chairs which we liked but that really didn't go with the table at all.  Really the table just didn't do much for us anyway because it was small and only seats four.  We also need more seats than the 4 that we bought.  So I bought another cheapy patio table secondhand for $20.  I also bought a used set of 8 metal folding chairs.  A little spray paint, some new outdoor fabric for the seats, and we've got two matching tables and a bunch of extra seating that also matches.    The chairs are seriously cute and such an easy fix.  Really makes me want to buy more chairs and do more but I don't think we need that many folding chairs.  Total cost for the patio furniture (spray paint, fabric, the table and folding chairs)-less than $50.


We ate supper outside tonight.   The kids were tickled pink.
We hardly ever eat outside, mostly because it's always felt messy.

The green bench is an old piano bench but it works great as a spot to plop my herbs.  
And yes, there are herbs in the large container, they are just not up yet.  Soon we'll have parsley, basil, and cilantro.
The other container has two kinds of mint.

We now have 4 olive green folding chairs and 4 aqua blue ones with a combination of 3 fabrics, including some that was leftover from when I covered the cushions on the front patio furniture so not only do they match the stuff in the back, but the chairs match the couch on the front porch.
I really ought to take a better picture because they are just so cute.  (I know, I said that already.)

Tuesday, May 6, 2014

No Fuss Seasonal Decor

Looking for an easy way to save your kids' artwork that doesn't involve shoving them in a box somewhere, never to be looked at again, until your child is an adult and you finally make them get their junk out of your house? 

 Here's one way that purposefully upcycles artwork into something more polished.  First, pick one spot in your house where you will consistently display the artwork.  I set aside this shelf in our entryway just for seasonal decor.  I also used a shelf because it's easier to accomodate frames of various sizes.  You don't have to worry about nail holes or if the nail is too high or too low.  Next, select a few frames that are dedicated for this purpose.  My favorite ones are some 12 x 12 scrapbook frames from Michael's.  They are meant to hold decorated scrapbook pages, so they will hold artwork that is three dimensional.  I can also place multiple pages in them, rotating the pages as the seasons change.  Last, pick the artwork you want to use.  I have stuck with mostly handprint pictures since my kids have made quite a few of these for the holidays.   Don't be afraid to do a little modifying to the pages.  My older two made handprint turkeys in preschool, 2 on a page for a total of 4.  But they were a bit wonky looking, off center, and just didn't fit into a frame very well.  So I trimmed off the excess and fashioned each handprint into a 3 x 5 rectangle.  Then I glued each handprint to a piece of scrapbook paper, so that each handprint looked matted.  The handprint art in the photos below also benefited from a bit of scrapbook paper embellishment.  I really didn't spend a lot of time on it; just enough to make the handprint art fill my frame.  (And in the case of the flowers, I used it to create a grass/sky type background.)  Over the years, we've collected quite an assortment of various seasonal pieces.  Turkeys for Thanksgiving, reindeer for Christmas, snowmen for winter, a torn paper heart for Valentine's, a flower and butterfly for spring, and an autumn tree for fall.  I always add a few extra seasonal accents and it has turned into a quick way to change out our entry way for the holidays as well as an easy way to showcase the things my kids have made.

What our entryway looks like this week
(At least until yesterday, when I shut the front door too hard and one of the pictures fell off and the glass broke.

My red stools-I actually have a collection of red stools which is probably odd.  The middle one was my Granny's, one the kids almost always sat on at her house.  I found these two (plus another one that's in our living room) at an auction for a couple dollars a piece.

The rake and hoe are children's garden tools with wooden handles and metal (ie definitely poke your eye out) ends.  They were my mother in law's.  They are definitely cute but potential weapons, so the shelf is the best place for them.

Sunday, December 29, 2013

Did Someone Say Peanut Butter Oreo Dip?

When it comes to school related gifts (ie Valentine's Day, Christmas presents for teachers, etc.), I try to find something my kids can be involved with so they have some type of investment in the gift.  This year, I opted for jars of sweets, presented with pretzels for some yummy sweet and salty dipping.  I bought some glass jars on Hobby Lobby half off and packed them full of Peanut Butter Oreo Dip (um, peanut butter, Nutella, Oreos-yes please!) and Dulce De Leche Carmel Dip (which is seriously the easiest one ingredient recipe ever thanks to your slow cooker.)  Then the kids made gift tags, counted out and packaged up thick pretzel rods, and placed the dips and the pretzels into gift bags.  Yum!

Zeke and Kenson hard at work

The finished product

Friday, July 26, 2013

Almost No-Sew Project

D's grandma had this couch in her basement for years.  It was just a plain stained brown with striped cushions.  I thought it would maybe be a good piece of patio furniture so we brought it home with us when she passed away.  I painted it black and distressed it and then recovered the cushions.  I took the completely lazy way out and hardly sewed a stitch on the cushions.  I found two clearance shower curtains at Target for $13 each.  (No way you could buy that much indoor outdoor fabric at a fabric store for that price.)  They were actually the right width but not the right length to cover the foam.  So I trimmed the extra length out of the middle of the curtains, keeping both hemmed ends.  I cut about 2 inches in from one hemmed in when I cut the extra out which gave me two pieces of fabric, a large piece with the buttonholes for the shower curtain and a small strip with a hem.  Those two pieces would then be joined back together with a seam and I used bias tape to make no sew ties which I inserted into the seam.  After sewing, I wrapped the rejoined fabric around the foam, tying the ties through the button holes to secure.  I then folded the ends over like a present and used safety pins to secure the folds.  That is all on the backside of the cushions and not something anyone is going to see so I was perfect happy to not sew it but instead pin it.  I think it took maybe 30 minutes.  However, my kids were around so really a 30 minute project takes more like an hour.   (And I was dreading doing it so I got one cushion covered and then stopped.  It has taken me all summer to finish the second cushion.)  It's a cute addition to our front porch and the fabric matches the new glider I put in by the glider.

Before-halfway done with the old striped cushion

All done

New glider-can't wait until the landscaping actually comes in.  There's a purple butterfly bush and iris behind the glider and an oakleaf hydrangea on the right side.

And a few shameless garden pics...because the garden actually looks pretty good right now.  Other than some funky fungus (?) issue with my zucchini and cucumbers that I'm hoping I've got fixed.


Wednesday, September 5, 2012

A Few of My Favorite Things

Since we got moved into our new house, I've had a few people ask how we are liking the house. 

Things I'm loving...
  • Having my husband home by 4:30
  • Being able to quickly run to school, to Walmart, to church, etc..
  • The open layout which makes us feel more connected especially at meal time as I'm preparing food in the kitchen

Things I am not loving...
  • The fly invasion, apparently from open doors from the builders and during the move
  • The muddy yard which is a bit of an oddity since it has not rained all summer long; it's really due to us watering plants, hitting the grassless yard with the sprinklers, and then the kids, the grown ups and the dog tracking it in
I also have a few diy projects that I'm really thankful we did in the new house, things that I love because they are functional or just because they make me smile.
Kitchen-I really like our penny tile which ordered from Overstock.com.  (2.95 shipping made it completely affordable.)  I love our grey black laminate counter tops.  And I love the barstool which we ordered online from a school supply catalog.


Kitchen-if you could take the above picture and turn to the right, this is what you would see.  It's actually a large black stripe of chalkboard paint with cream on the top and the bottom.  The frames are Goodwill finds which we painted and distressed.  I love having my calendar right in front of me.  I have been putting our verse for the week on it plus a prayer chart.  And, it's also handy for writing up consequences when you don't have time to enforce the consequence right away.

Kids bathroom-I used some old pieces of molding to make these towel hooks.  The vertical one has a Mason jar attached with wire to hold the toothbrushes and toothpaste.

Love these prints that I found on Zulily.

Love the light fixture which is actually from a farm supply catalog.


Living room-perhaps the item I am most excited about...our entertainment center.  We made it from our old dresser and two old doors.  I think it maybe cost us $50.  The oil can on the bottom left shelf is from D's grandpa's gas station.

Dining room-This bookshelf makes me smile.  I bought it many years ago at an auction.  It was painted a reddish orange.  I added the gingerbread brown and distressed it.  The sign we found this summer at an antique mall.  I actually spent $50 on it which my mom thought was crazy.  The painting is from Haiti.  The top shelf has Jadite from Derek's mom and grandma, Derek's grandma's nut chopper, my granny's rolling pin, and a few other bright bowls.  The second shelf has a display of marbles, dominos and blocks with the first two being from Derek's grandma. 

Entryway-The chalkboard was Derek's mom's when she was little.  The hooks are from an auction and are wonderfully chippy.  The cubbies are a bookshelf I found at my grandma's.  I painted it and had Derek cut part of it off so I could turn it sideways to use for shoes.  The handprints were a gift from Derek to me and each clipboard below the handprint is for the kids to hang their favorite pieces.  I'm hoping to get the words "Our Gallery" to put above the handprints.

Thursday, September 29, 2011

Check out my new Flicker photostream

As quite a few of the people who read this blog know, I occasionally channel my inner sewing goddess to make things for myself, my kids, and other people.  One of the niche items that I make for others are satin lined, fleece hats.  For curly haired folks, winter hats are nightmarish.  They breed frizziness like rabbits breed more rabbits.  And for people who have curly hair that has the texture I like to call "velcro", winter hats often mean lint that gets stuck in your hair as the interior of the hat deposits fuzzies into your hair.  So, knowing how many people have said they wished they could find a satin lined winter hat, I decided I could come up with something that would meet that need, at a reasonable price.  The thought was 1.  satin reduces the friction between the hair and the hat therefore reducing breakage of hair 2.  satin reduces friction between the hair and the hat therefore reducing the frizzies that can easily make a braided style that may have taken hours look messy  3.  satin has no fuzzies that remain in the hair after the hat is removed.  I've sold an assortment of hats through my Etsy store but have never really gotten around to creating a display of the hats I've made.  Until today when I decided the quickest and easiest way to make such a display was to put the photos on a Flicker photostream.  Since many of them are custom orders with a customer specifying colors or the overall effect of the hat, there are lots of different looks.  Go ahead and browse.  (See the photos below for a small sampling of the hats.)  And pass the info on if you know someone who is looking for such a hat.  Or head on over to my Etsy shop and contact me so you can order on for yourself or curly haired kiddo.

IMG_4973


IMG_3725

IMG_5194

Saturday, September 10, 2011

ABC Bible posters

A while back, I saw some handy dandy ABC posters.  They were unique in that each one featured a letter of the alphabet and a Bible verse.  (Score!  Two things we need to work on:  knowing God's word and the alphabet.)  And the graphics with each poster were simple yet cute.  The price tag was not so cute.  $30 for a set of posters that you had to print yourself.  So being the craft goddess that I am (wink, wink), I decided I could use my scrapbook program to do essentially the same thing.  (Plus I would get the benefit of deciding what Bible verses to use.  I used the bulk of the verses from the poster set simply because it required less work but there were a few verses that I wanted to include and some I thought I could come up with a better verse than the one that was used.)  I also decided that to conserve ink I would do a smaller version ie 4 to an 8 1/2 by 11 piece of paper.

Here's the result:


They will fit perfectly on my kitchen cork board and I'm guessing the kids will love being chosen to go get the verse for the night and bring it in as we finish up supper.

Tuesday, August 2, 2011

My Sunday afternoon

After having piles upon piles of fabric and stacks of patterns, I finally got around to actually making something.  I've been intending to make Conleigh some cute little skirts so that was what I did.  Pretty easy pattern that would have gone together much better if I weren't tired.  I kept pinning things together wrong sides together which is not the way to make much of anything.  I did have to call my mom once for help but actually I figured out my question mostly on my own once I started talking to her about it.

At some point, I'll add this as a custom order on my etsy shop where you will be able to pick your own colors and patterns and create a one of a kind twirly skirt.  But that would require me finding a few more fabric selections.  At any rate, I think it would make a great gift for any little girl.


Wednesday, May 4, 2011

Teacher Appreciation Gifts


Borrowing an idea from Our Best Bites, the kids and I created some A-D-O-R-A-B-L-E end of the year gifts for their preschool teachers and classroom aides.  (The link has the premade labels as well as some generic ones and some Mother's Day ones.)  So easy and they turned out so well. 

The basic jist is to buy a pull top can of fruit, open the can from the bottom, empty out the can, wash and dry it, fill with some goodies, close the bottom back up with hot glue, then add a label and some ribbon.  We filled ours with strawberry flavored Jello Rainbow Popcorn and Skittles.  (The popcorn recipe calls for peanuts; I never make mine with them.)

The kids helped me make the popcorn, cut out the decorative paper for the labels, glued the labels on the paper, filled up the cans, and cut the ribbons.  

I have to say I like these so much that they may become a traditional end of the year gift.

Tuesday, November 9, 2010

Easy Peasy Layered Satin Flowers

Sooo...we had scheduled family pictures for Saturday and I ordered a cute flower barrette off of etsy.com just for the purpose of the pictures.  I ordered two weeks ahead of time and didn't think much of it until the Wednesday before pictures when I realized it hadn't arrived yet.  I contacted the seller who was easy to work with but the real issue was that I didn't have anything for Conleigh's hair for the pictures.  I was wanting something special, something that was unique.  The closest store is Walmart which has a pretty decent hair accessory selection but they didn't have exactly what I had in mind.  Next choice would be to drive 45 minutes to a larger town with more selection but I was just there on Tuesday and was going back on Saturday.  Really don't want to waste my gas just for a hair dealie.  So I decided that it might be time to try making my own satin flowers using a couple of different tutorials I had seen online. 


The first one came out a bit to large for Conleigh's head, but it was still pretty cute.  (See here for a great tutorial for a similar flower.)  The other ones are just layered circles which I've seen in a variety of spots.  These are the ones I ended up using.  I actually got two compliments on them at the photo place.  Anyway, I'm hoping to add some to my etsy shop so be checking there.  And I'm always happy to do custom orders if you'd like some for stocking stuffers.  Pretty cute, I have to say...


Thursday, June 17, 2010

From ladies long sleeve shirt to...

this: a cute sundress with ribbon and ric rac.
Faux cap sleeves are made from the cuffs, ruffled for added detail. The back is actually the front of the shirt with the buttons running down the length of the back.


Simple and easy, really only a couple of hours worth of work.

Tuesday, June 15, 2010

Mock Selvage Skirt Project


A big bag of small scraps (cottons, corduroy, satin), a garage sale that had a huge box of free jeans that had holes in their knees, and a book loaned to me (That Dorky Homemade Look, a comedic look at quilting) all resulted in me deciding to get crafty. I've also really been wanting to try something with some 1 inch size strips of fabric. So this project was perfect...Conleigh thought it was pretty. (She also thought it was pretty when it was just the top part of the old pair of jeans cut off. She quickly put it on and said "Pretty. Show Papa.") Anyway, maybe if I get ambitious I'll have some more in my Etsy store sometime soon...