Showing posts with label Houses. Show all posts

Saturday, September 12, 2015

Boys' Shared RoomWell

It's been slow going downstairs since we started/finished the basement project last winter.  The spaces that were finished with drywall have had paint and doors and trim but we still had quite a few things left to finish up.  The nailholes in the trim all need filled and painted.  The doors all need painted as well.  And the family room and the boys' room had nothing on the walls.  I have slowly been getting the boys' room finished.  As you can tell by the photos, they've already added their own pictures via blue painters tape.

Part of what I was waiting on was for D to cut me the pegboard and trim for the art behind the beds.

The art is just pegboard, 1 x 2's, and a cardboard monogram from Michael's.
The monogram is attached to the pegboard using pegboard hooks so it's a really easy install.

To finish the cardboard letter, I used different kinds of washi tape plus a few pieces of scrapbooking paper.
After trimming the excess, I modpodged over the top.

Bookshelf, lego table, and stuffed animal basket, hat is overflowing...truth in advertising here.  Asking them to get rid of a stuffed animal is like cutting off an appendage.  So no neat pile of toys for us.  Just a big overflowing heap.  You'll also notice I did not take any pictures of the closet.  There's a reason for that.

The waterfall picture is actually a Chinese batik that was given to us by the government officials of Zeke's province.  It features the Haungguosho Waterfall which is located there, which is the largest waterfall in China.

The wooden boat is Haitian made, one we bought for Kenson on one of our trips to Haiti.

And the pennants are actually paper.  I found a paper pack of pennants at Michaels, string included for less than $2.

And this my friends is an end table made completely from plastic.  I had been wanting to make a homemade Lego table but when I headed to the thrift store they only had two tables that were the two tiered variety.  One was plastic and one was wood but the wood one was much wobblier.  I figured I would take a chance on the $3 plastic one and brought it home to spray paint.  Then I added a lego base plate and it was done

Terrible picture but oh well.
My faux plantation shutters have gaps but I'm okay with that.
I really wasn't need total black out, just something to keep the light from streaming completely in.
The window is kind of weird in that it is an egress window (so I didn't want a shade that would be hard to get out of in an emergency) and it adjoins the bulkhead in the ceiling that hides the ductwork (so you can't even hang a regular curtain rod)
I found 3 old sets of shutters and separated one set so that my new shutters were 3 panels long.
D screwed them into the walls and they work perfectly.
We all need a basketball hoop in our hallway, right?


These are magnetic display boards.  I really liked the color and the pattern.

They were just the thing to display pictures of those who were in my boys' lives before us.

Thursday, July 9, 2015

Boys Bathroom Reveal

This winter, we started on the task of finishing our unfinished basement.   We had tried to think through how to arrange kids and bedrooms upstairs but with only two small bedrooms available for four kids, the space upstairs just didn't seem big enough.  I have one kiddo who has trouble with sleep and that kiddo needs to not share a room.  We tried all three of the big kids in one room for a bit but that required a trundle bed and once the trundle was out, the room was completely filled and there wasn't even any room to walk.  Once it is completely finished, our basement will have a storage space, a large walk in closet just off of the family room, a family room, a bathroom, two large bedrooms with egress windows, and one small (and I mean small) bedroom/storage space that really isn't a bedroom since it doesn't have a window but could be used as one in a pinch.  We framed and drywalled all of the space so the rooms are partitioned out but we only completely finished the family room and adjoining closet, one of the large bedrooms, and the bathroom.  Our contractor worked through most of December and January so we've actually been using the space for quite a while.  But it's been kind of hodge podged together, since soccer started pretty much right after that.  things kind of stalled with nothing on the walls and things not quite put all the way away.  We are still working on parts of it this summer but are getting closer to having things all in order.

Aside from painting the doors, the bathroom is the first room to be fully competed.  The bathroom is basically the boys' bathroom.   (Which means it smells icky and may or may not have a flushed toilet.)  We used yellow, grey, and white as the main colors.

I really like the double pedestal sinks.
I love how sleek and modern they look compared to a traditional pedestal.
We debated if we would rather do vanities
but it seemed like there wasn't a good way to get a double vanity in and still have enough room for storage near the door.
The lights above are actually outdoor lights.  Bathroom #2 with an outdoor fixture above the sink.

Super Heroes...perfect for my oldest who loves them all.

This little cubby is one of my favorite parts of the room.
It utilizes that wasted space that houses the shower pipes and is made from just drywall and white shelving.

Truth...toothpaste globs on the shelves.
The enamel bowls are part of a set a found at an antique store quite a while ago.
(I have them in green, blue, and orange too.  They are such vivid colors with just the right amount of chippy appeal.)

Wednesday, February 18, 2015

Low Cost Nursery Redo

We're now onto plan b regarding Kai's room.  With his arrival, it became apparently that our new house was feeling a bit on the small side.  We had two bedrooms for children but they are pretty small (like 10 x 11) and 1, 500 square feet on our upstairs but that also felt pretty crowded at times.   Once Kai moved out of his bassinet, it became clear that he was not going to be able to share a room with Conleigh since he wasn't (and still isn't) sleeping through the night consistently.  He usually wakes up 2-3 nights a week and since Conleigh is a kiddo who easily wakens and struggles with getting enough sleep, sharing a room with her was not really going to happen.  We tried moving her in with the boys but three kids in a small room, with her on a trundle was not working.  It was a bit like stacking cordwood.  So we decided to finish a portion of our unfinished basement and now have a large bedroom for Kenson and Zeke, a bathroom, and a family room that are completely finished.  So the big boys moved downstairs, Conleigh went back to sleeping in her old room, and Kai got the remaining upstairs bedroom.  I used what we already had on hand rather than redoing a bunch of stuff for him.  I bought 3 new prints for his room that cost $30 total and aside from the new room darkening curtains, those were the only items I purchased.  I stole a few items out of my fall decorating stash (the orange willow tree and the acorn garland), grabbed a cute toy fox beanie out of the kids' toys, and found the other items in other places around the house.


Tuesday, May 6, 2014

No Fuss Seasonal Decor

Looking for an easy way to save your kids' artwork that doesn't involve shoving them in a box somewhere, never to be looked at again, until your child is an adult and you finally make them get their junk out of your house? 

 Here's one way that purposefully upcycles artwork into something more polished.  First, pick one spot in your house where you will consistently display the artwork.  I set aside this shelf in our entryway just for seasonal decor.  I also used a shelf because it's easier to accomodate frames of various sizes.  You don't have to worry about nail holes or if the nail is too high or too low.  Next, select a few frames that are dedicated for this purpose.  My favorite ones are some 12 x 12 scrapbook frames from Michael's.  They are meant to hold decorated scrapbook pages, so they will hold artwork that is three dimensional.  I can also place multiple pages in them, rotating the pages as the seasons change.  Last, pick the artwork you want to use.  I have stuck with mostly handprint pictures since my kids have made quite a few of these for the holidays.   Don't be afraid to do a little modifying to the pages.  My older two made handprint turkeys in preschool, 2 on a page for a total of 4.  But they were a bit wonky looking, off center, and just didn't fit into a frame very well.  So I trimmed off the excess and fashioned each handprint into a 3 x 5 rectangle.  Then I glued each handprint to a piece of scrapbook paper, so that each handprint looked matted.  The handprint art in the photos below also benefited from a bit of scrapbook paper embellishment.  I really didn't spend a lot of time on it; just enough to make the handprint art fill my frame.  (And in the case of the flowers, I used it to create a grass/sky type background.)  Over the years, we've collected quite an assortment of various seasonal pieces.  Turkeys for Thanksgiving, reindeer for Christmas, snowmen for winter, a torn paper heart for Valentine's, a flower and butterfly for spring, and an autumn tree for fall.  I always add a few extra seasonal accents and it has turned into a quick way to change out our entry way for the holidays as well as an easy way to showcase the things my kids have made.

What our entryway looks like this week
(At least until yesterday, when I shut the front door too hard and one of the pictures fell off and the glass broke.

My red stools-I actually have a collection of red stools which is probably odd.  The middle one was my Granny's, one the kids almost always sat on at her house.  I found these two (plus another one that's in our living room) at an auction for a couple dollars a piece.

The rake and hoe are children's garden tools with wooden handles and metal (ie definitely poke your eye out) ends.  They were my mother in law's.  They are definitely cute but potential weapons, so the shelf is the best place for them.

Saturday, March 1, 2014

Bedroom Reveal

The last two rooms in the house to be "put together" were the master bathroom and the master bedroom.  I'm still not sure the master bathroom is done as I have a few other things in mind once I can convince the husband to do them for me.  But the bedroom is done.  (And we moved the bassinet into our walk in closet for a variety of reasons so it's finally free of the baby clutter.  Lest you think we have a gigantic walk in closet, the bassinet pretty much fills the whole space.)  We used aqua, red, cream, and black as focus colors. Anyway, thought I'd share a few pics.

When we first got this headboard many years ago, my mom thought it was overkill, I think.
But the footboard had been damaged so we ended up getting the headboard at a reduced price.

Vintage window-not sure if I should say it was free or tell you how much we spent when we replaced the windows in our our previous house since this is one of the leaded windows from there.
It was too far damaged to use as a window so it had to be removed.
The lamp was actually one we had; I just spray painted the base and added a new shade.
The blue candy dish was D's grandma's.  I use it for jewelry.
The table was out of D's grandma's house too.  (Say the magic words-free!)
It had some type of laminate flooring glued onto it so we stripped that off and then I painted it cream with black distressing.

The artwork is Haitian steel drum art that my cousin brought back on her recent trip to Haiti.
The bird lamp I found at Goodwill awhile back.  (Maybe spent $3.)
The nightstand was one I bought at an auction for like $5.
It need refinished and some of the veneer was chipping off so more cream paint with black distressing.


The bedspread is one we've had for several years.
I made the bedskirt.  It's a seersucker type fabric with aqua and flecks of many other colors.


This artwork is actually framed handkerchiefs that were D's grandma's.  I originally bought artwork in square frames at Goodwill with the intention of taking out the artwork and matting the handkerchiefs like a regular picture.  I didn't like how that looked so I instead used an album cover frame from Michael's and used the square frames to frame out that.
Quick hit of black spray paint and they all match.

I made the curtains.  The red side panels were a bargain bin sheer fabric from Hancock Fabrics and were seriously less than $10 for both sets.   The faux shade is just a panel mounted on a tension rod.  We never open our bedroom curtains just because of privacy needs to it seemed silly to spend the time and effort to make them a functioning shade.  They are an aqua and cream damask pattern in cotton.  The light filters in a bit but they keep us from baring all to anyone walking through our backyard.  (Which right now is no one but the friendly woodchuck living under our neighbors garage but at some point, that might change.) 
The drop down desk was another item we got from D's grandma's house.
My last true "fix" for this room would involve the tv cords.  I just need to buy some type of paintable cover for them so I can cover them up with something that matches the wall.

Last summer, right before the baby arrived, D built me these floating shelves.  The silver pieces are all thrift store finds.  The art is Chinese and is an ink painting of the Great Wall of China done with only an artist's fingers and hands (no actual brushes were used).  It's a piece we bought when we were picking up Zeke.

The bench is actually one that goes with our dining room table.   Our harvest table has two benches but we only use one so this one seemed to fit perfect in our bedroom.  The two pillows are actually vintage Ebay finds; I think I got them like ten years ago but love that they still fit with my decor.

Sunday, August 25, 2013

39 Weeks

In case you're wondering, last Friday marked 39 weeks of pregnancy.  My official due date is Friday, the 30th.  The correct answer to how I am feeling is "Pregnant."  I really haven't felt too sorry for myself especially after my doctor's appointment last Wednesday when there was a woman in the waiting room who was very pregnant and looked so miserable.  But Friday evening, Saturday morning, and this morning have kind of found me in a bit of a funk.  Can't say I'm miserable but just ready.  (And a smidge crabby and hormonal.)  Tonight seems to be better.

I actually have several unrelated pregnancy thoughts running through my head so I guess I'll share them.

I'm kind of convinced that perhaps the reason Kai is avoiding delivery involves my children.  I think it has to be awfully offputting to have 3 children rest their little heads on my stomach while whispering, "Baby, come out soon!" in a slightly spooky, horror film type voice.

I am also convinced that he needs to arrive soon or I may turn into a shopping addict.  I've bought several things in the last month or so, many off online Facebook sites for area people selling items.  Included in my purchases were a new area rug for the living room (from Zulily) which was kind of a major purchase but one we had been thinking about as our old rug was too small.  Our furniture did not sit on the edges of the rug and since we have wood floors and felt pads on the furniture, the furniture was often sliding all over the place.


As I mentioned before, I bought the boys a new dresser.  And on a complete whim this week, I bought new chairs for the dining room.  I can't say that was something we had talked a lot about but we had complained a lot about our old chairs.  Our old chairs were a Craigslist find.  I think I paid $60 for 6 maple stained Windsor backed chairs.  They are super solid and very heavy.  I painted and distressed them so they were robin's egg blue with black underneath.  Truly they were a labor of love because there were a ton of spindles to work around.  I really did like the way they turned out.  However, they took up a very large space in our dining room because they did not slide under the apron of our farm table.  They are also a pain to clean since you have to wipe around so many spindles.  Last, the feet were in not pristine shape.  The previous owner had put on some type of slides which were hammered in but half of those were missing but the nail still remained in the foot.  The feet were also cut off on some of them and not quite even.  I covered them with rubber cups to protect the floor but the cups would not slide which made it hard to get in and out of.  So I put felt pads on the rubber cups but the pads were adhesive and attracted dog hair which was just kind of gross.  Anyway, I saw 4 Mid Century modern vinyl and metal chairs for a decent price ($60 for 4) and thought I would give them a try.  (I figured if I didn't like them, they were cheap enough I could resell and that my old Windsor style chairs should be able to be sold for close to the $60 if we decided to keep the new yellow ones.)  I would be more in love with them if they were blue instead of yellow but I do still like them.  They wipe down so much easier, take up much less space, and don't have hairballs so that makes it a win for me.


Finally, I had a wonderful moment in church today thanks to an unlikely source.  We have an older lady at church who often talks to us about our family, being pregnant, adopting, etc..  She means well sometimes the things she says are ones you wish she would filter.  Today, she started her usual conversation about my pregnancy and ended up gushing about how special we were as people to just take in the kids like we have.  Our family friend, John, was sitting behind us and before I could even speak, he interjected, "Well, I think they have pretty special kids."  If you know John, he's not exactly a wordsmith but today his words were perfect.  I was just thankful to hear him affirm to my kids who were sitting beside me, that adoption is not about us being special parents but about all kids being special kids.

So that's the random week 39 news.  Still pregnant, my kids are anxious, I'm on a buying streak, and my friend, John, made my day...

Saturday, August 10, 2013

A New Dresser and a New Theory

Zeke sat in the toy box a few weeks ago and broke it beyond repair.  It was a nice little box with a lid that kept the mass of stuffed animals under control and hidden away.  So it left me wondering what to find to replace it.  I found nothing.  Like new stuff that cost $75 for a simple little toy box.  Or ugly stuff like a Rubbermaid tote.  

Then crazy pregnancy brain took over and I decided I'd hit a few yard sales and see if I could find a cheap dresser.  Because then I could move the kids' clothes out of the dressers in the closet and use the dresser for the now homeless toys.  

And why on earth wouldn't a lady who is 9 months pregnant buy and refinish a dresser a few weeks before having a baby?  

I did find a dresser for $25 that I thought would work.  I hauled it home and started sanding.  

And then realized I was nuts.  It really would have been an easy project but honestly, one I had no business starting.  

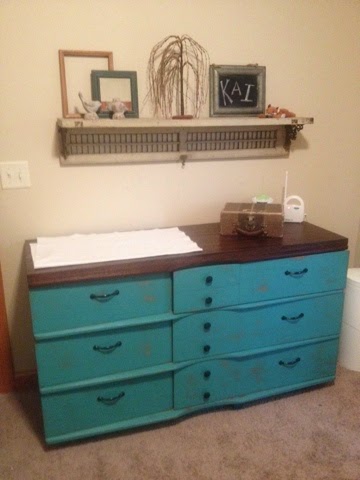
I then resorted to Facebook and a local group I am on for refurbishing furniture.  Many of the people on there are small business owners who refinish furniture on the side.  One of the women on there had a long dresser she would refinish for $150 in the colors of my choice.  She also would take a trade on the dresser I bought.  She agreed to value my trade at $30 so for $120 I ended up with this beautiful solid wood dresser done in turquoise with a dark stained top.  So much better than what $120 would have bought at Walmart or Target and done in colors that match the boys' room.  Hopefully it will be tough enough to withstand boys.  It's also big enough to hold all of the boys' clothes so that meant I could simplify their closets a bit.

Really, this would probably look better with some art above it but it works just fine.  The containers on the left are actually canister sets from Walmart that were like $2 a piece.  I just spray painted the white lids brown.

I also am adopting a new theory regarding the kids' room.  We decided to photograph everything in the rooms and use those photos as reminders of what a clean room looks like.  I'm hoping this might help them be more independent in cleaning and keep us from the ongoing battle of "go pick up your room", "it is clean", and then walking in to find piles of toys and dirty clothes and trash.  We'll see...
I cleared out some of the toys under the beds and put them on the bookshelves.  Think that will help with the "stuff everything under the bed problem?"  Probably not but...

Even took pictures of under the beds...

And the closets...

And the shoes...

Tuesday, July 9, 2013

Our small vintage laundry room

Our laundry room has been pretty much done since around Christmas time but I had been debating about swapping the light out for something less builder grade/modern and more vintage.  I think I've decided to leave it as is for now.  Anyway, getting pictures up on the blog is good incentive for actually cleaning up the space rather than ignoring it in favor of cleaning up the rooms that seem to matter most like the kitchen and living room.  It's not perfectly clean and you'll never see my hampers empty but I did dust the shelves so give me credit for that.

Our laundry room is actually pretty small.  Like maybe 7 x 8 or so.  So not giant laundry room with a huge folding island and room for an ironing board or small craft or office station.But it's much bigger than my old laundry room which only had a 2 x 5 foot section of floor space and where the door actually opened up into the space and took up much of that valuable floor space anyway.

 D built two stackable cubbies out of plywood which give me a sorting station for the clean clothes.  Right now, each person in our family has a basket and their clean, folded clothes go right into their basket.  The big kids are all responsible for putting that away as part of their chores each day.  To the right of that is an empty space where I keep the vacuum, mop, broom, and steamer.


I found some vintage shopping baskets on etsy and sewed some easy liners for them.  Those then hold the dirty clothes which the kids sort into lights and darks.  Ideally, I would have liked to have one more of those but I didn't have room for it so our towels all go into the green basket that sits on top of the cubbies.  Really, the towels stay in the bathrooms for the most part until I go get them to wash them so it's mostly just kitchen towels that find their way into the laundry room throughout the week.


The word "laundry" is made from chipboard letters from Hobby Lobby that I spraypainted with hammered metal paint.  The embroidered tea towels are some my great aunt gave me for our wedding.  I've used them occasionally for decoration but now I really have a much better way to see them.  I've seen several really cute things with wooden hangers so I knew I wanted to somehow use them in my laundry room.  I also knew I wanted to do something different for a curtain.  So I came up with this window valance.  The top section is a board with old glass doorknobs.  We had actually used it in Conleigh's old room but didn't have a place for it at the new house so I painted it black to use in the laundry room.  The curtain is a vintage lace tablecloth that I sectioned out evenly and clipped onto some wood hangers that I found at a thrift store.  I actually picked up a handful of wooden hangers at the thrift store so a few of the extras found homes in between the embroidered tea towels.


If I were to change anything, there are two things I would change.  1.  My washer and dryer doors open out into the laundry room instead of towards the exterior wall.  It's not a big deal but I have to step around the doors when I'm taking dry clothes out and putting them into the laundry baskets.  2.  The light fixture still sort of bugs me.  I love this light by Barn Electric but not the price tag.  I had contemplated trying to make my own from a plain school fixture by painting the base and the globe but I'm a little worried about it not putting out enough light since most schoolhouse fixtures only use one bulb.  So with that in mind, I think I'm going to leave what we have.

Anyway, so thankful for a new laundry room.  And always thankful for electricity and running water which make it all possible as I think about all the Haitian ladies who do their laundry in the river.

Monday, July 1, 2013

Conleigh and Baby Room Redo-Our Eclectic Shared Room

Conleigh's room was one project that never quite got finished after we moved in.  I had made her curtains and bed skirt before we moved and added circle decals to the walls but that was as far as I got before we headed to China to get Zeke.  Then it was a few months of adjusting to a new family.  Then our December surprise of "oh, we're having a baby!  Guess they are going in Conleigh's room."  Then a few months of waiting to see if we were having a boy or a girl which affected how we would decorate.  Finally, after months and months of being unfinished, the room is done.  I ended up not using my curtains that I made because they had a lot of pink in them.  And I probably wouldn't have used the circle decals but they were already up so I just left them.  Other than that, I think it looks like it will be a great shared space for a boy and a girl who have to share rooms.

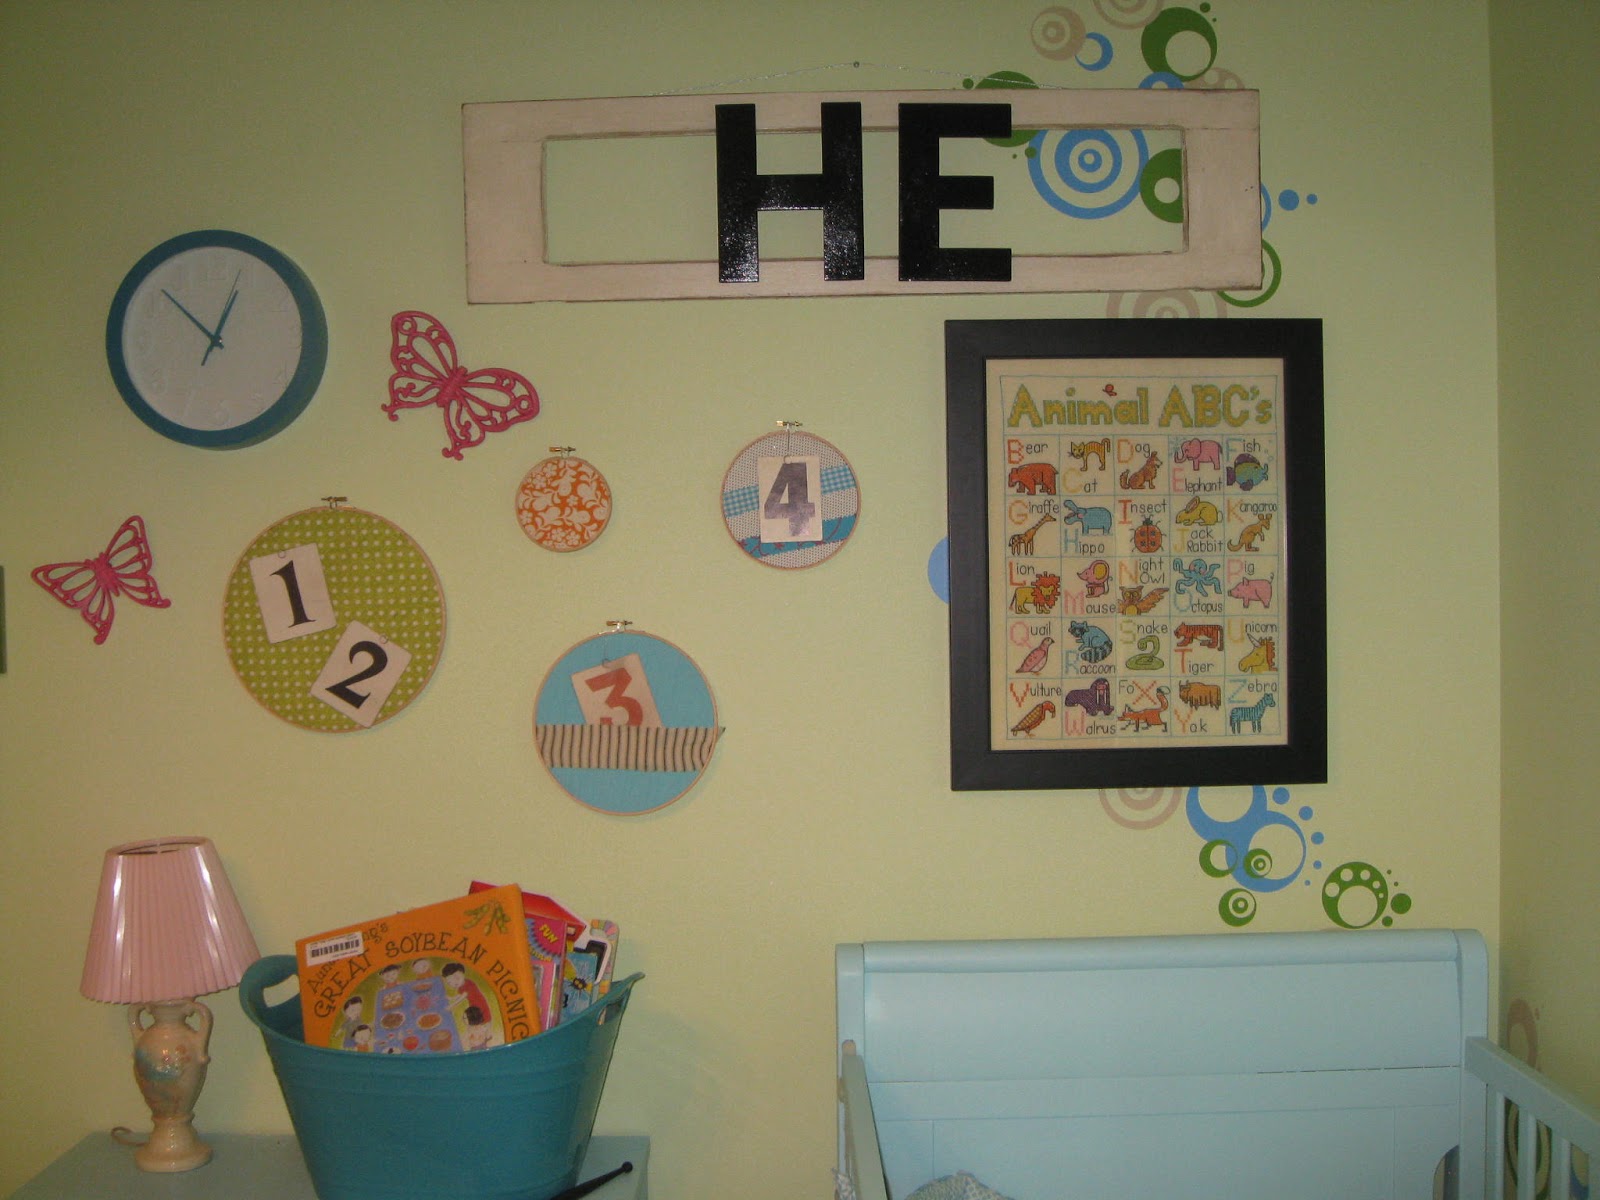
I used most of what I already had on hand so it was pretty low cost too.  The crib, bed, and dresser got a fresh coat of paint.  The rag curtains were all from fabric I already had.  I made the embroidery hoop pictures by using fabric I already had and adding some old hymn numbers.  The butterfly picture above Conleigh's bed is one that she got for her birthday.  The ABC cross stitch was actually mine when I was little, made by my Aunt Sheree.  The mirrors and butterflies were garage sale and thrift store finds that I spray painted.  The he and she signs were made from old shutters that someone was selling on an online site.  The interiors had already been removed.  I spray painted chipboard letters to create the words.

My supply list :
1 gallon of blue paint for the bed, crib, and dresser, $25
8 knobs for the dresser, from Hobby Lobby, at 1/2 off, $16
Old hymn numbers, from Etsy, $12
Embroidery hoops and scrapbooking pins, from Joann's, $7
Wall clock, from Target, $6
Frames for pictures, from Micheal's, at 1/2 off, $40
Vintage mirrors and butterflies, thrift stores and garage sales, $6
Chipboard letters, from Hobby Lobby, $10
Old shutters, local online site, $15 for 6
Vintage lamp, local online site, $10
Crib bedding, used from Ebay, $50 for all

It might be one of my new favorite rooms in the house.


Friday, November 16, 2012

Kid Play Space-Completed!

D goes back to work next week which means he has been off for over a month.  I am so grateful that his employer lets him take paid leave; most dads don't get to do that.  And I am so grateful that he chooses to do that; a lot of dads don't do that.  Lest you think it's all roses and sunshine where I sit around and just sing his praises, I also am grateful he's been home to finish up a bunch of projects!
 
Like our backyard.  He hauled mulch and put in our gravel dig pit this week.  (The swing set and play structure were put up right after we moved in.  We actually paid the fence company to sink the posts for the play structure which was definitely the best $70 I've ever spent on a construction related project.)  Our kid space is now complete and I love it as do the actual children. 
Things I like best: 
1.  The swing set because it was free  - My friend, Kelly, was getting rid of it because her daughter had outgrown it.  It's a bit faded from the sun but still sturdy and well used.
2.  The stump balance beam because it was also free - The corner of the yard where we put in the play area actually had a medium size spruce.  (The variety that eventually take over the whole yard)  So we cut it down but we kept the stumps to use for this.  It's great for balancing or for sitting.
3.  The gravel dig pit because I'm pretty sure we will get hours of entertainment out of it.  I opted for gravel over sand for several reasons.  I was wanting to avoid problems with alley cats.  I was wanting to avoid sand in shoes; I think I would rather deal with gravel.  I was wanting to avoid sand in the hair.  Between playing trucks and digging with shovels, the kids have had a great time.
4.  Communication tubes made from plumbing supplies - I have no idea what the actual name of this product is.  But it's cheap and it works.  Zeke thinks it is so much fun to yell into them and I've enjoyed watching him.
 
We still have some major landscaping in the back, front, and side yards but I'm definitely glad to have a kid friend space.